
Table of Contents
This blog post may contain affiliate links. As an Amazon Associate I earn from qualifying purchases.
“Is there a mode that I can dictate the shutter speed but have the camera do auto for everything else? FYI I’m shooting on a 6D.”
If you’ve ever stared at your Canon’s mode dial wondering why the shutter speed won’t budge, you’ve hit the same wall that stops most beginners from leaving auto mode. Every shot you take in Auto is a shot where your camera decided the result — not you. The fix takes under a minute once you know which dial to turn.
This guide explains exactly how to change shutter speed on a Canon camera — whether you own a Rebel T7, an R50, or a 5D — so you can freeze fast action or blur motion on purpose. We’ll cover the core steps, model-specific controls, and a full troubleshooting section for when settings appear greyed out.
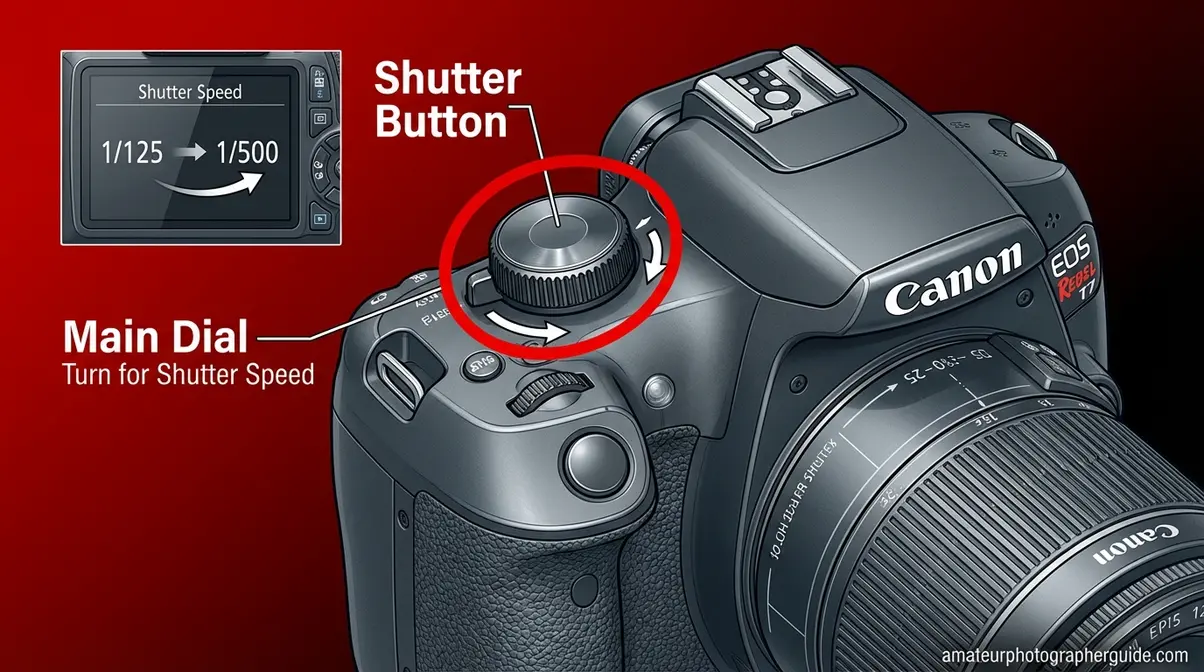
To change shutter speed on a Canon camera, switch your mode dial to Tv (Shutter Priority) or M (Manual) — Auto mode locks this setting completely. This is The Mode Gate: your mode dial is the single gatekeeper between you and manual shutter control. Then turn the Main Dial near the shutter button to adjust the value.
- Tv mode lets you set shutter speed; the camera picks aperture automatically
- Manual mode gives you full control over both shutter speed and aperture
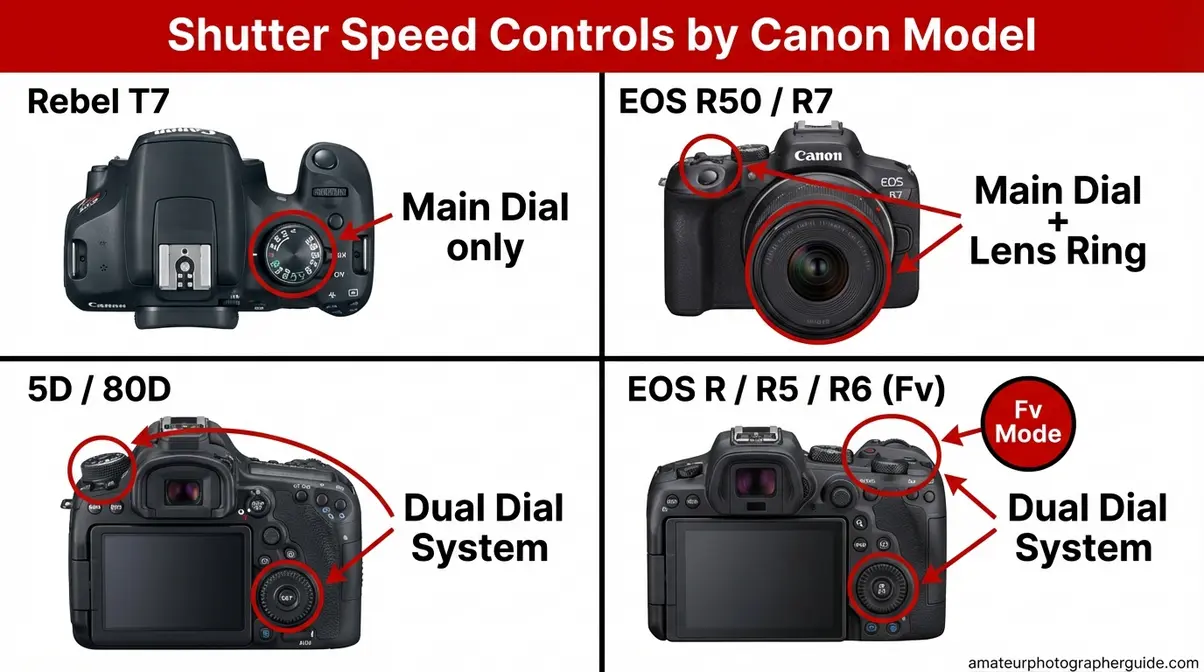
- Rebel T7 uses the Main Dial only; EOS R series adds a control ring on the lens
- Shutter speed greyed out? You’re in the wrong mode — this guide covers the fix
What Shutter Speed Does & Where to Find It
Shutter speed is measured as a fraction of a second — 1/125 means the shutter opens and closes in one hundred and twenty-fifth of a second. The popular Canon EOS Rebel T7 covers a range from 30 full seconds down to 1/4000s (per the official Rebel T7 Manual). That range gives you everything from silky waterfall effects to frozen athletes. Understanding what those numbers mean is the first step toward wanting to control them — and that’s why The Mode Gate matters.
What 1/60 vs. 1/1000 Means
1/1000 is dramatically faster than 1/60. Because shutter speed is a fraction of a second, the larger the bottom number, the shorter the exposure. At 1/1000s, the sensor is exposed for just one-thousandth of a second, while 1/60s is roughly sixteen times longer. For example, 1/1000s freezes a hummingbird’s wings, while 1/125s is a safe speed for handheld portraits. As Cambridge in Colour notes, fast speeds freeze motion while slow speeds create intentional blur.
A practical tip is The One Over Rule: if you’re shooting handheld with a 50mm lens, your shutter speed should be at least 1/50s to avoid camera shake. With a 200mm lens, your minimum becomes 1/200s. For a deeper dive into shutter speed fundamentals, these principles apply to every Canon body.
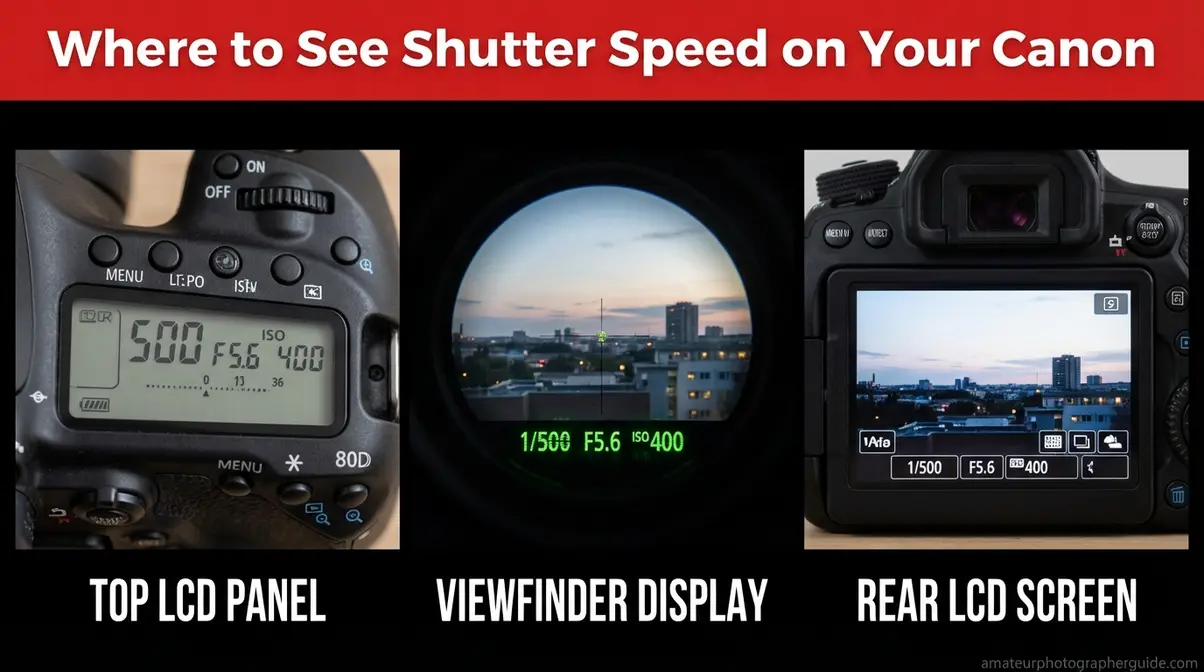
Where to See Your Shutter Speed
You can see the shutter speed on your Canon in three places:
- Top LCD panel (on bodies like the 80D, 5D, 7D): Appears as a plain number (125 means 1/125s) or with a quotation mark for full seconds (2″ means 2s).
- Rear LCD screen: Shown in the data overlay at the top or bottom of the display.
- Viewfinder: Displayed in the data strip along the bottom when you half-press the shutter button.
On entry-level Rebels like the T7, there is no top LCD panel. The viewfinder and rear screen are your only readouts. Canon USA Support confirms this display behavior holds across the EOS lineup.
Fast vs. Slow Shutter Speeds
The speed you choose drives the creative mood. Fast speeds (1/500s and up) freeze motion cold—perfect for sports, kids running, or birds in flight. Slow speeds (1/30s and below) deliberately blur motion, turning waterfalls silky and car headlights into light trails. The mid-range (1/60s–1/250s) handles everyday situations like portraits and street photography.
Understanding how shutter speed fits into the exposure triangle turns this from guesswork into craft.
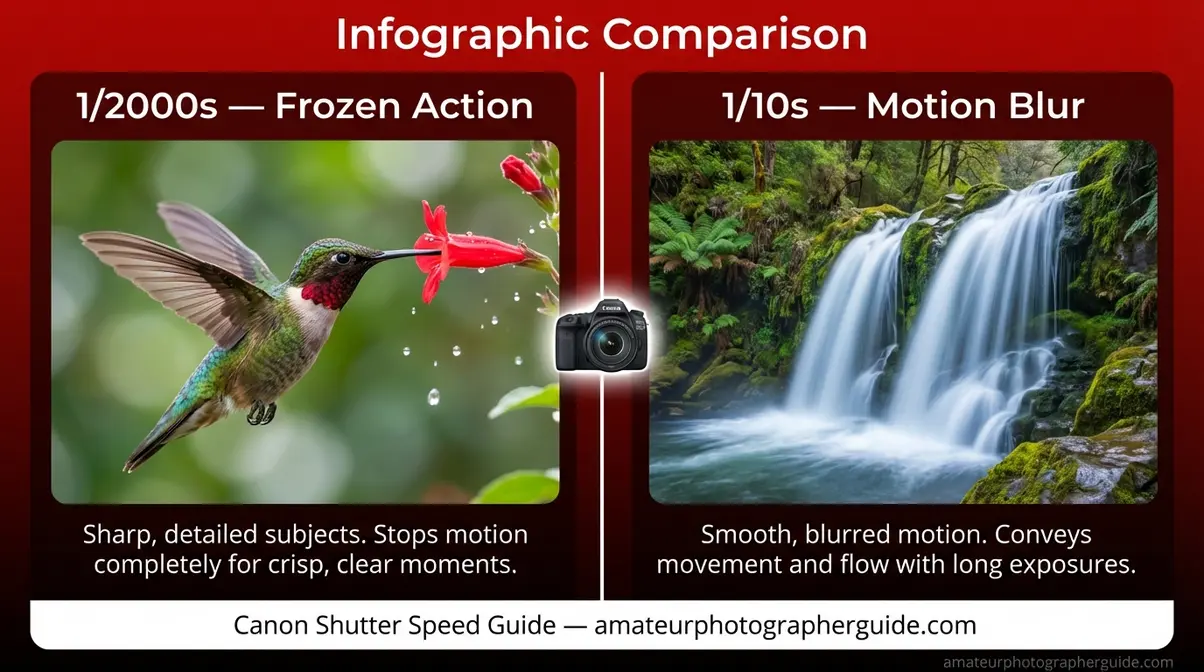
Caption: The difference between 1/2000s (frozen action, left) and 1/10s (motion blur, right) — both achievable on any Canon EOS body.
How to Change Shutter Speed on a Canon

The secret is a two-step process: pick the right mode, then turn the right dial. In Tv (Shutter Priority) mode, you set the shutter speed, and the camera automatically adjusts the aperture. This makes Tv the ideal starting point for beginners leaving auto mode.
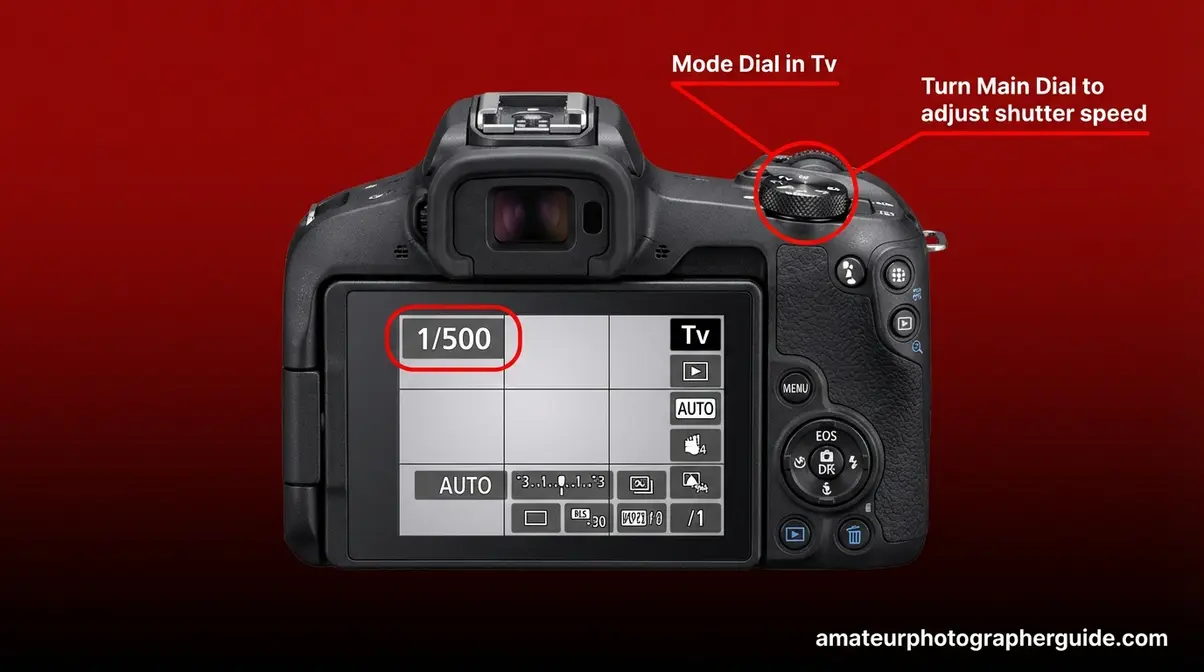
Step 1: Use Tv (Shutter Priority) Mode
This is where you open The Mode Gate. In any automatic mode (the green “A+”, Scene, or P), Canon’s processor owns the shutter speed decision. Switching to Tv transfers that control to you.
- Find the mode dial on top of your camera.
- Turn it until the indicator lines up with Tv (Time Value).
- On your screen, the shutter speed value will now be active (not greyed out).
Landing on Tv directly answers the common question: yes, this is the mode where you dictate speed and the camera handles the rest. How Shutter-Priority (Tv) mode works is simple: you set the time, and the camera sets the aperture.
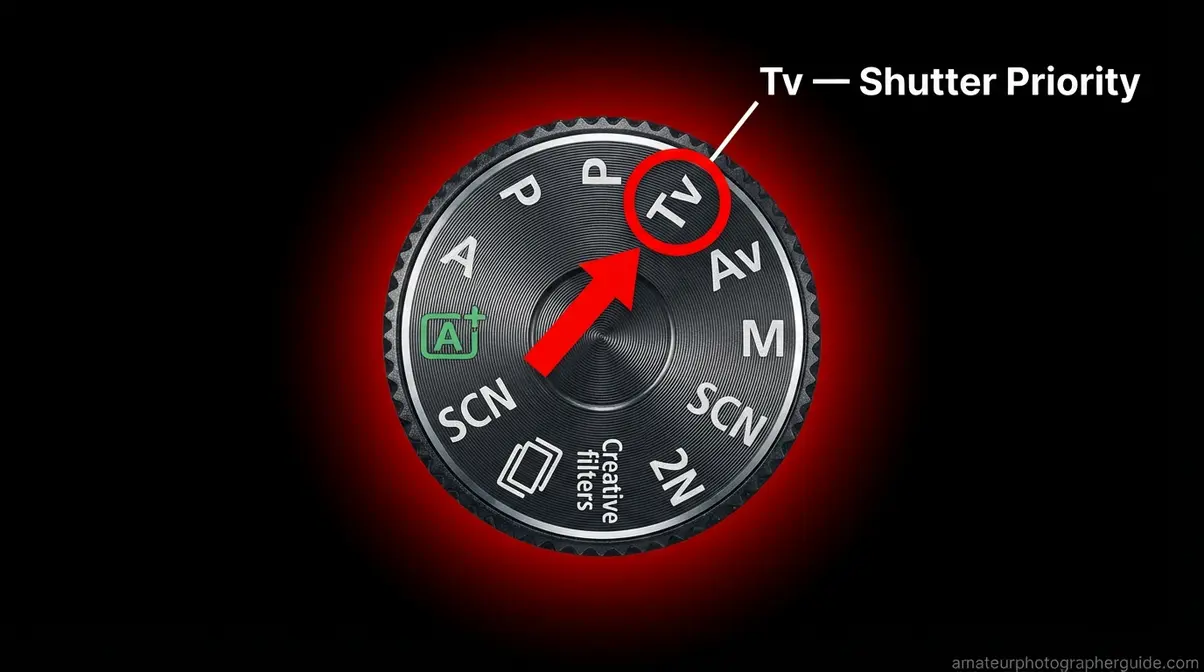
Caption: Setting the Canon Rebel T7 mode dial to Tv opens The Mode Gate, giving you shutter speed control.
Step 2: Turn the Main Dial
The Main Dial is the ridged wheel near the shutter button. On Rebel models, your index finger or thumb naturally rests on it.
- Turn right for a faster speed (e.g., 1/250s -> 1/320s).
- Turn left for a slower speed (e.g., 1/250s -> 1/200s).
The value updates live on the screen. If the number stays greyed out, jump to the Troubleshooting section—you’re likely still in the wrong mode.
Caption: The Main Dial on a Canon EOS body is the primary physical control for shutter speed.
Using Manual (M) Mode
In Manual (M) mode, you control both shutter speed and aperture.
- Shutter speed: Turn the Main Dial.
- Aperture (Rebel T7, T6): Hold the Av button on the back while turning the Main Dial.
- Aperture (5D, 80D, R7): Turn the rear Quick Control Dial.
Use the exposure meter bar in the viewfinder to guide you; a centered marker means a balanced exposure. The official shutter speed range for the Rebel T7 in Manual mode spans a full 30 seconds to 1/4000s.
Shutter Speed for Video
For video, the rule is to set your shutter speed to double your frame rate. This creates natural-looking motion blur.
| Frame Rate | Recommended Shutter Speed |
|---|---|
| 24 fps | 1/50s |
| 30 fps | 1/60s |
| 60 fps | 1/120s |
To do this, enter M or Tv mode and turn the Main Dial. Canon Europe’s shutter guide confirms this 180-degree rule is standard practice for natural motion.
Controls for Specific Canon Models
Canon’s control layouts vary. While the core method is the same, knowing which dial to turn on your specific camera is key. After checking community forums and testing on a Canon Rebel T7 and EOS R50, we’ve confirmed these steps.
Canon Rebel T7 (T6, T7i)
The Rebel T-series uses a single-dial layout.
- Turn the mode dial to Tv.
- Turn the Main Dial (behind shutter button) right for faster, left for slower.
- To change aperture in M mode: hold the Av button (back of camera) and turn the Main Dial.
- To change ISO: press the ISO button and use the Main Dial.
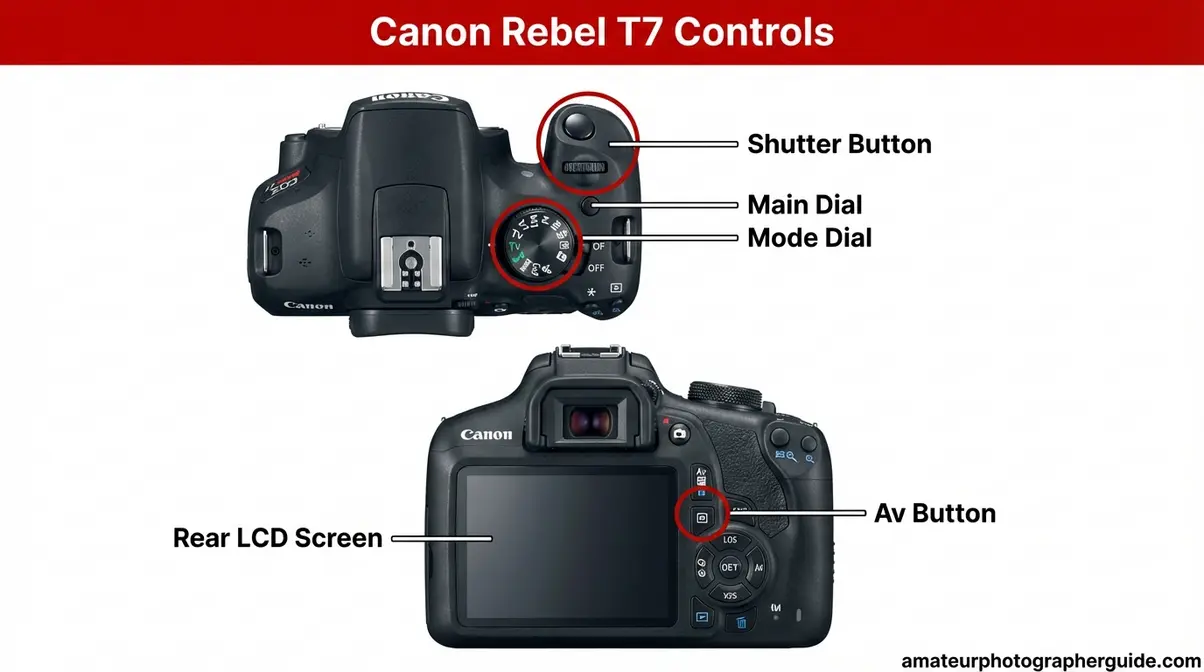
Caption: Canon Rebel T7 controls: Mode Dial (top-left), Main Dial (top-right), and Av button (rear).
The Official Canon Rebel T7 manual confirms this control scheme for both Tv and M modes.
Canon EOS R50 & R7
These mirrorless cameras add the RF lens control ring.
- Shutter Speed: Turn the Main Dial (top-right, same as DSLRs).
- Alternative: Assign shutter speed to the control ring on your RF lens via the Custom Controls menu.
- Aperture (R7): In M mode, the rear Quick Control Dial handles aperture directly.
For more on the R7’s layout, see our in-depth review of the Canon R7. Note that the touchscreen on the R50 is primarily for Touch Shutter, not adjusting exposure values.
Caption: On the Canon EOS R50, the shutter speed value is adjusted with the Main Dial.
Canon 5D, 80D & Pro DSLRs
These bodies use a dual-dial system for faster control.
- Set the mode dial to M.
- The Main Dial (top-right) controls shutter speed.
- The Quick Control Dial (rear wheel) controls aperture.
This setup is identical across the Canon 6D, 7D, 80D, and 5D lines. The Canon Community confirms this is the standard for all dual-dial bodies.
Canon EOS R, R5 & R6 (Fv Mode)
Fv (Flexible-priority AE) mode on the EOS R, R5, and R6 is a hybrid of Tv, Av, and M. You can set any parameter manually while leaving the others on Auto.
- Turn the mode dial to Fv.
- Turn the Main Dial to highlight shutter speed.
- Turn the Quick Control Dial to set the value.
- Leave aperture and ISO on A (Auto), and the camera handles them for you.
Using Canon’s Fv mode, as DPReview confirms, allows for a true hybrid between manual and automatic control. See our Canon EOS R features and performance review for a full walkthrough.
Troubleshooting: Why Can’t I Change It?
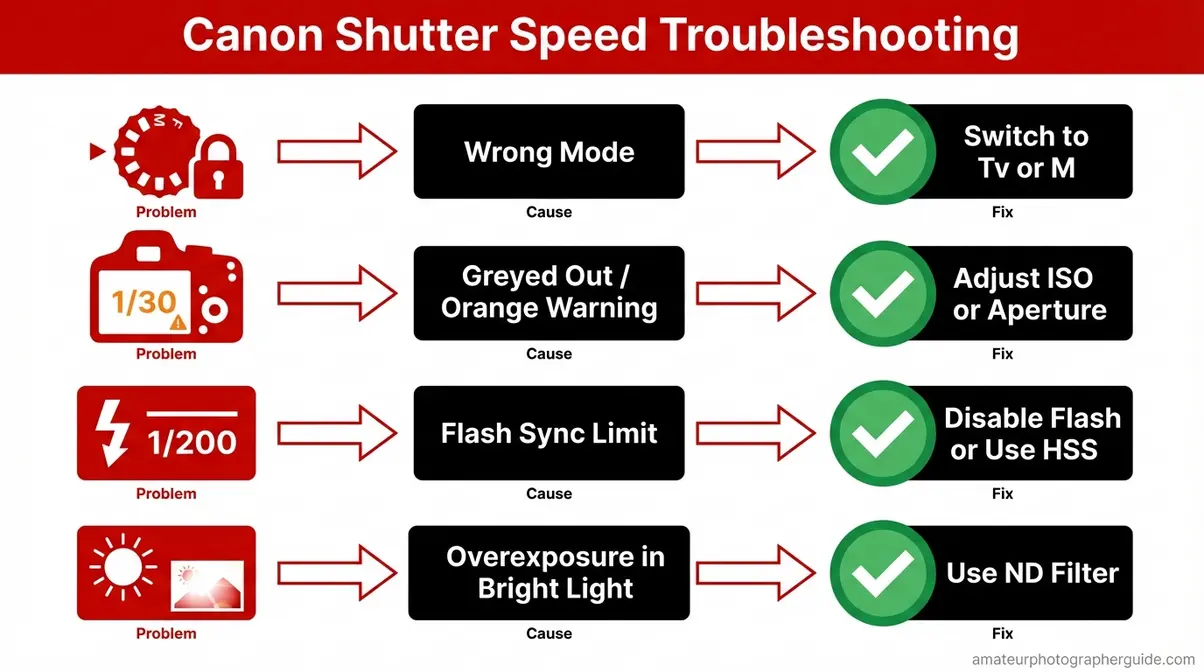
You turned the dial, but the number won’t move. Here’s why The Mode Gate is likely still closed.
Problem: You’re in the Wrong Mode
Symptom: Turning the Main Dial does nothing, and the shutter speed value is frozen.
Cause: The mode dial is set to Auto (A+), P, SCN, or a filter. In these modes, the camera controls all exposure settings.
Fix: Turn the mode dial to Tv or M. The Main Dial will now adjust the shutter speed.
Problem: Setting Is Greyed Out/Orange
Symptom: The shutter speed number appears in orange, not white.
Cause: An orange display is an exposure warning. It means the camera cannot achieve a correct exposure with your chosen settings (per Canon USA Support, 2026).
Fix: In Tv mode, adjust your ISO (raise in low light, lower in bright light) or enable Auto ISO. In M mode, adjust shutter, aperture, or ISO until the exposure meter in the viewfinder centers at 0.
Problem: Max Speed is 1/200s (Flash)
Symptom: Your shutter speed maxes out at 1/200s, even though the camera can go faster.
Cause: When a flash is active, the camera locks the shutter speed to its flash sync limit (typically 1/200s on most DSLRs). This ensures the sensor is fully uncovered when the flash fires. Exceeding it can cause a black band on your photo (Digital Photography School, 2026).
Fix: Turn off the flash or enable High-Speed Sync (HSS) if your external flash supports it.
Problem: Overexposure Warning on Bright Days
Symptom: You get an overexposure warning in Tv mode even at your fastest shutter speed.
Cause: In bright sunlight, even the camera’s fastest shutter speed and smallest aperture (e.g., f/22) might let in too much light.
Fix: Use a neutral density (ND) filter to reduce light, lower your ISO to its minimum setting, or find a shadier spot.
Next Step: Adjusting Aperture
Once shutter speed makes sense, aperture is the next lever to master. On single-dial Canon cameras, the process is slightly different.
How Aperture & Shutter Speed Connect
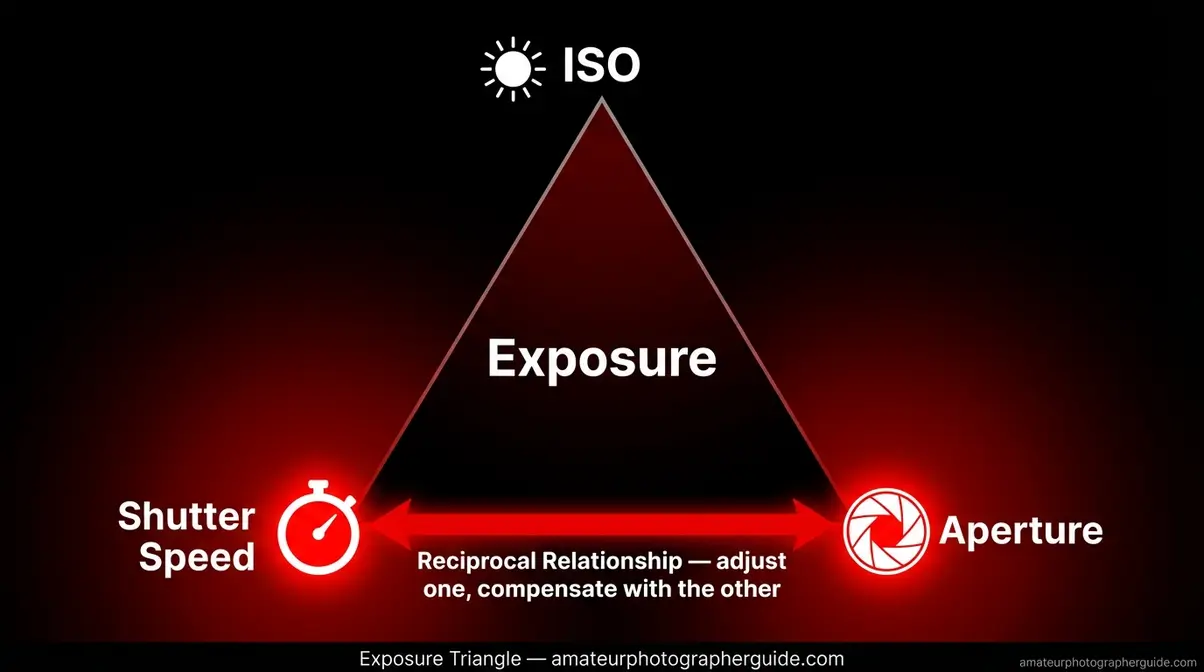
Aperture (f-stop) controls the depth of field and the amount of light entering the lens, while shutter speed controls motion and light duration. They are two sides of the Exposure Triangle. B&H Photo explains the Exposure Triangle clearly: adjusting one requires compensating with another. The relationship between aperture and shutter speed, per Canon U.S.A., controls both exposure and artistic effects simultaneously.
How to Change Aperture in Manual Mode
- Rebel T7 / T6 (single dial):
- Turn the mode dial to M.
- Hold the Av button (back of camera).
- Turn the Main Dial while holding Av to change the f-stop.
- 5D / 80D / R7 (dual dial):
- Turn the mode dial to M.
- Turn the rear Quick Control Dial directly.
For a complete guide to aperture, the principles here extend into all other creative decisions.
A Note on Limitations
When These Steps Don’t Apply
These steps apply to Canon EOS DSLR and mirrorless cameras. They may not work for older Canon PowerShot point-and-shoots, which often hide settings in menus, or Canon Cinema EOS cameras with professional video layouts.
When to Use Tv vs. M
- Use Tv when you want to control motion (freezing sports or blurring water) without managing exposure.
- Use M when you need consistent exposure across multiple shots, like in a studio or for video.
- Use P when you want a safer step between Auto and Tv. Turning the Main Dial shifts the exposure program, giving you some influence without full responsibility.
Frequently Asked Questions
How do I see the shutter speed on my Canon camera?
Look in the viewfinder, on the rear LCD screen, or on the top LCD panel if your camera has one. A value like “125” means 1/125s, while “2”” means two full seconds. Half-press the shutter button to activate the display.
What mode do I need to be in to change the shutter speed on a Canon?
You must be in Tv (Shutter Priority) or M (Manual) mode. In Tv, you set the shutter speed and the camera selects the aperture. In M, you control both. Fully automatic modes like the green “A+” or Scene modes lock the shutter speed completely, preventing manual changes.
Which shutter speed is faster, 1/60 or 1/1000?
1/1000 is much faster than 1/60. Since shutter speed is a fraction of a second, a larger number on the bottom means a shorter, faster exposure. 1/1000s is fast enough to freeze sports action, while 1/60s is about sixteen times slower and risks motion blur if your subject moves.
What’s the difference between Tv and M mode on a Canon?
Tv (Time Value) mode lets you set the shutter speed while the camera automatically adjusts the aperture to get a correct exposure. M (Manual) mode gives you full control over both shutter speed and aperture. Tv is great for controlling motion without the math, while M offers total creative control for consistent results.
Conclusion
For Canon photographers ready to leave auto mode, shutter speed control comes down to one thing: The Mode Gate. Switch your mode dial to Tv for motion control with automatic exposure, or M for complete creative authority. The Canon Rebel T7 offers a shutter speed range from 30 seconds to 1/4000s (Canon USA Support), covering everything from silky waterfalls to frozen hummingbirds.
The Mode Gate reframes a confusing problem into a single decision. You weren’t missing skill—you were missing the key. Now that the gate is open, the logic applies to every Canon you’ll ever own: find the mode dial, find the Main Dial, and you’re in control.
Start in Tv mode today. Set your shutter speed to 1/500s and photograph something that moves. Once you see a frozen subject instead of a blur, you’ll never reach for Auto again. When you’re ready for the full picture, our guide to shooting in Manual Mode on Canon walks you through the next level.
